Here at the Whitney Whisk, I'm all about cooking. I love, love, love to cook! For today, though, our post has almost nothing to do with cooking. Almost-- I have a love for cooking in aprons (I have fifteen of my own).
This summer I have been trying to get in to crafting. I've made independence day decorations and a multitude of baby toys and accessories for the three babies to come into our family! A while ago I got the idea to make aprons for two little nieces turning three who got little kitchens for their birthdays last year. Well, I've slowly been working away at them over the past two weeks and I was so excited about the final product that I wanted to share. I tried to make each apron epitomize the style and personality of the little girl it was going to-- trust me, at three they already have acutely distinct personalities.
I went to Hancock Fabrics beforehand to scope out fabric options before buying, then went home and put some ideas together from pictures I'd taken on my phone. I made a rough sketch of each apron and then made my own patterns for each. I used measurements and suggestions for both from this blog post-- the second apron follows it more closely but is still different.
 Both aprons are made with velcro for the neck and waist ties, as per the suggestion of the blog tutorial linked above. This makes for easier removal by the kids themselves.
 I knew I wanted a peter pan collar but the bow and stitching came last as I was finishing the apron. It just needed a little something up there and I think I definitely found that something. In the process, I learned how to tie the perfect bow so that's a plus.
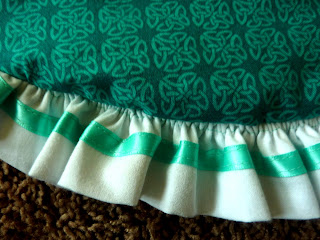 What can I say, I love a good ruffle. I'm very much in to pleats and gathers and anything feminine when it comes to clothes.
 When I told my sister that I was going to make Ava an apron she said she'd been thinking about making her a little chef's hat. I thought that would be the perfect accessory. I used this tutorial but I made the rim shorter and opted to go with the classic white fabric. When cutting the circle I just measured 18", found the 9" mark and the measured 9" out from that center mark around in a circle.

 I went with a sweetheart neckline, which is not so easy to see in this photograph. It was inspired by this apron. The top felt a little empty so i adorned it with a set of pearls and a sweet little bow off to the side. I am a serious pearl girl, myself.
 When I saw these frills I knew they were exactly what I was looking for.
 I was trying to come up with an accessory for Ella, like the chef hat above, but I wanted something different. I made her a little headband with a big bow that I will give her but I just wasn't in love with it and then the idea of a matching oven mitt struck me and I whipped up a little pattern for it. The inside layer has minky fabric with a layer of batting in between.
Happy Birthday Ava and Ella!
This summer I have been trying to get in to crafting. I've made independence day decorations and a multitude of baby toys and accessories for the three babies to come into our family! A while ago I got the idea to make aprons for two little nieces turning three who got little kitchens for their birthdays last year. Well, I've slowly been working away at them over the past two weeks and I was so excited about the final product that I wanted to share. I tried to make each apron epitomize the style and personality of the little girl it was going to-- trust me, at three they already have acutely distinct personalities.
I went to Hancock Fabrics beforehand to scope out fabric options before buying, then went home and put some ideas together from pictures I'd taken on my phone. I made a rough sketch of each apron and then made my own patterns for each. I used measurements and suggestions for both from this blog post-- the second apron follows it more closely but is still different.
Ava's Apron
Ava is a very sweet, very fun and often silly girl who loves lambies and asking questions. While definitely very feminine, she doesn't seem to care about pink or princesses. In fact, she told me just last week that her favorite color is white! Well she's lucky because I'd finished her apron by then and it definitely has a lot of white in it.
I used this apron for a base of inspiration and then put my ideas to work from there.
I used this apron for a base of inspiration and then put my ideas to work from there.


Ella's Apron
Ella is a sweet and quite spunky girl who loves princesses and dressing up. She asks her mom for "lips" (lip gloss) often and has her own set of 'high heels.' She is all girl and in honor of this I thought something very frilly and very pink would do the trick.


Happy Birthday Ava and Ella!


